Aftermarket Rear Disc Brakes Installation
by George Nenadovich
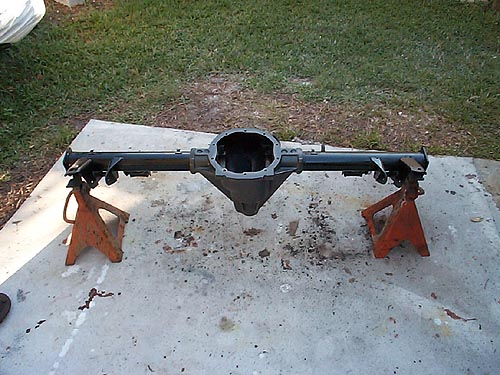
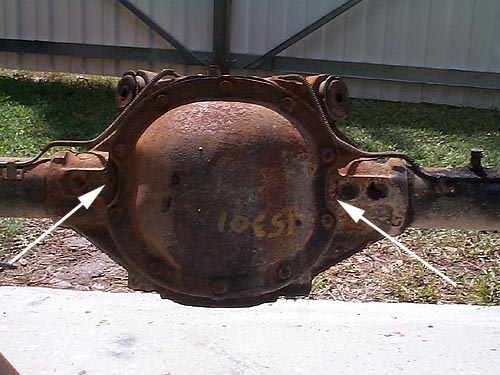 Here is the stock 1972 Skylark 8.5" corporate rear axle.
This unit was removed from a 72 Skylark 4dr and has the two "cut outs"
at the 9 and 3 o'clock positions as indicated by the arrows. You can also
find these rears in the 71-2 Skylarks and Cutlass models. Other models such
as LeMans, Monte Carlo, Chevelle, Grand Prix can also have this rear axle.
They are 28 spline, non C-clip rears (bolt in axle shafts) and called corporate
rears since you can use the center section from any 71-88 GM car, van, truck
with the 8.5" center section.
Here is the stock 1972 Skylark 8.5" corporate rear axle.
This unit was removed from a 72 Skylark 4dr and has the two "cut outs"
at the 9 and 3 o'clock positions as indicated by the arrows. You can also
find these rears in the 71-2 Skylarks and Cutlass models. Other models such
as LeMans, Monte Carlo, Chevelle, Grand Prix can also have this rear axle.
They are 28 spline, non C-clip rears (bolt in axle shafts) and called corporate
rears since you can use the center section from any 71-88 GM car, van, truck
with the 8.5" center section.
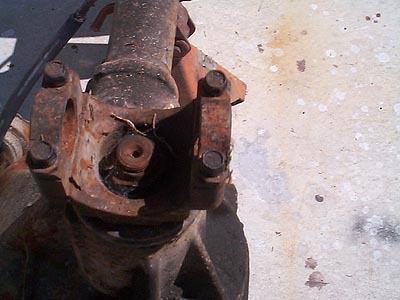 This shows the pinion yoke. The earlier rears are 8.2"
and use U-bolts w/nuts to retain the driveshaft u-joint to the pinion yoke.
The 8.5" rears use screws w/straps as shown in the pic. This is the
easiest way to identify the corporate 8.5"
This shows the pinion yoke. The earlier rears are 8.2"
and use U-bolts w/nuts to retain the driveshaft u-joint to the pinion yoke.
The 8.5" rears use screws w/straps as shown in the pic. This is the
easiest way to identify the corporate 8.5"
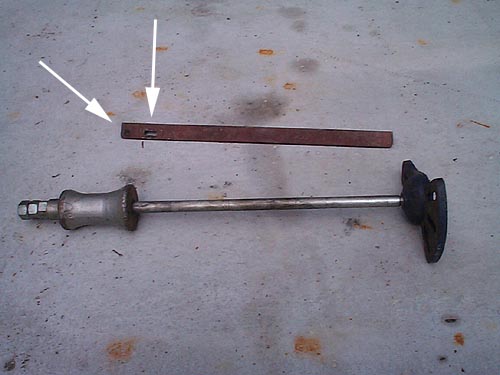 Here are a couple "special" tools you need to disassemble
a rear. The bottom one is called a "slap hammer" or inertia puller.
There are 4 nuts that hold the axle flange to the axle tube. There are 3
holes in the axle flange so you can slide a 9/16" hex head socket through
it to remove the 4 nuts. Simply attach the right end axle flange (slotted
to slide over a wheel stud) and use a lug nut to hold it in place. Slide
the hammer back a few times and the axle will come out of the axle tube.
Repeat the process for the other side. The top tool is a pinion stop I fabricated
from some angle iron. See below for more detail.
Here are a couple "special" tools you need to disassemble
a rear. The bottom one is called a "slap hammer" or inertia puller.
There are 4 nuts that hold the axle flange to the axle tube. There are 3
holes in the axle flange so you can slide a 9/16" hex head socket through
it to remove the 4 nuts. Simply attach the right end axle flange (slotted
to slide over a wheel stud) and use a lug nut to hold it in place. Slide
the hammer back a few times and the axle will come out of the axle tube.
Repeat the process for the other side. The top tool is a pinion stop I fabricated
from some angle iron. See below for more detail.
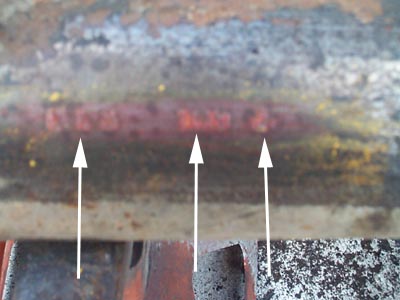 Here is the axle code stamped on the passenger side axle
tube. It is very hard to read and I had a hard time getting the camera to
show the digits/letters clearly. The first arrow points to the axle code
which is LKB. This, LK, indicates the gear ratio of 2.56 and non-posi. The
B stand for Buick rear manufacturer.Other letters are O for Olds, P for
Pontiac, GF for Chevy Gear and Axle, C for Chevy Buffalo, K for GM of Canada,
W for Chevy Warren. The next arrow points to the day of the year which is
109. The 109th day would be second week of April. The last digit is 2 for
second shift.
Here is the axle code stamped on the passenger side axle
tube. It is very hard to read and I had a hard time getting the camera to
show the digits/letters clearly. The first arrow points to the axle code
which is LKB. This, LK, indicates the gear ratio of 2.56 and non-posi. The
B stand for Buick rear manufacturer.Other letters are O for Olds, P for
Pontiac, GF for Chevy Gear and Axle, C for Chevy Buffalo, K for GM of Canada,
W for Chevy Warren. The next arrow points to the day of the year which is
109. The 109th day would be second week of April. The last digit is 2 for
second shift.
 A wider view to show the location of the numbers/letters
in reference to the passenger spring perch and center pumpkin.
A wider view to show the location of the numbers/letters
in reference to the passenger spring perch and center pumpkin.
 Here is the axle completely stripped, wire brushed, sanded
and painted. The center section is natural cast iron while the axle tubes
are black. This axle was completely disassembled for gear change, posi installation,
rear disc brakes and for a body-off restoration.
Here is the axle completely stripped, wire brushed, sanded
and painted. The center section is natural cast iron while the axle tubes
are black. This axle was completely disassembled for gear change, posi installation,
rear disc brakes and for a body-off restoration.
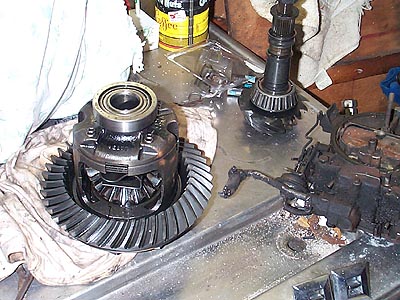 Here is the posi for this rear axle. This unit was removed
from an 85 Electra wagon with the 8.5" rear.
The pinion nut is 1.25" and usually requires a great
amount of torque to break loose. The pinion stop pictured above works great
on this and in the salvage yards when removing 8.5" posi units and
pinion gears as mentioned previously from the 85 Electra. The angle iron
can be any length but I made mine about 27" long so it can fit in my
salvage yard tool box. I also slotted one of the holes to fit several different
pinion screw spacing. Simple remove two screws and the strap from the pinion.
Place the pinion stop over the pinion and reinstall the pinion screws. Now,
use a 1/2" breaker bar and 1.25" hex socket to break the pinion
nut loose. The pinion bar will prevent the pinion and yoke from turning
as you loosen the pinion nut. Place your hand inside the pumpkin and hold
the pinion before you completely remove the nut. If you don't the pinion
can fall out and get damaged.
Here is the posi for this rear axle. This unit was removed
from an 85 Electra wagon with the 8.5" rear.
The pinion nut is 1.25" and usually requires a great
amount of torque to break loose. The pinion stop pictured above works great
on this and in the salvage yards when removing 8.5" posi units and
pinion gears as mentioned previously from the 85 Electra. The angle iron
can be any length but I made mine about 27" long so it can fit in my
salvage yard tool box. I also slotted one of the holes to fit several different
pinion screw spacing. Simple remove two screws and the strap from the pinion.
Place the pinion stop over the pinion and reinstall the pinion screws. Now,
use a 1/2" breaker bar and 1.25" hex socket to break the pinion
nut loose. The pinion bar will prevent the pinion and yoke from turning
as you loosen the pinion nut. Place your hand inside the pumpkin and hold
the pinion before you completely remove the nut. If you don't the pinion
can fall out and get damaged.
 This is the aftermarket kit sold by TSM, for more info
you can visit TSM Website
for more info.
The kit is basically a bolt-on set-up using new rotors, caliper
brackets, e-brake adapters and rubber flex hoses. The items not shown for
this kit are the 80-85 Seville, Toronado, Eldorado, Riviera. The only items
require a little more effort to install are the brake hose brackets which
will be welded to the axle tube.
This is the aftermarket kit sold by TSM, for more info
you can visit TSM Website
for more info.
The kit is basically a bolt-on set-up using new rotors, caliper
brackets, e-brake adapters and rubber flex hoses. The items not shown for
this kit are the 80-85 Seville, Toronado, Eldorado, Riviera. The only items
require a little more effort to install are the brake hose brackets which
will be welded to the axle tube.
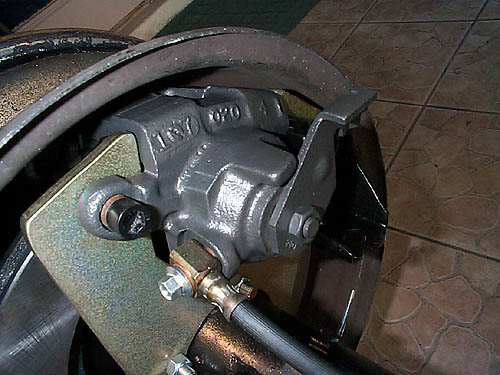
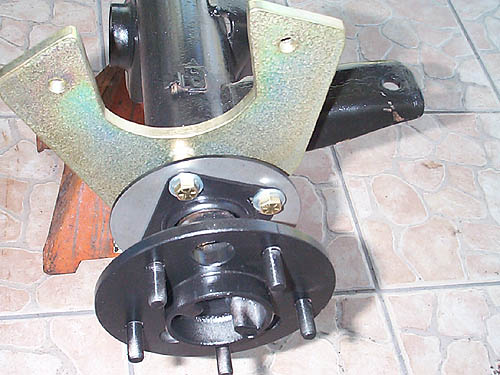 Here is the caliper bracket mounted to the axle flange and
the spacer plate is used to replace the old factory backing plate.
Here is the caliper bracket mounted to the axle flange and
the spacer plate is used to replace the old factory backing plate.
 Rear shot of the caliper bracket. Notice the caliper bracket
bosses face the axle flange. If you have the smooth side facing the axle
flange, you will not be able to get the caliper on the rotor.
Rear shot of the caliper bracket. Notice the caliper bracket
bosses face the axle flange. If you have the smooth side facing the axle
flange, you will not be able to get the caliper on the rotor.
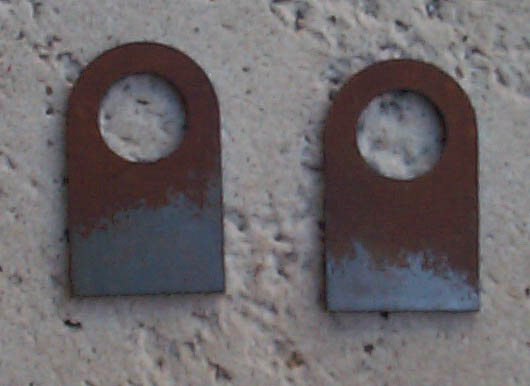 These are the weld on hose brackets to replace the factory
hard line to the wheel cylinders. The calipers use a rubber hose which will
pass through these holes and have a "U" clip hold them in place.
You will have to shorten the factory hard line and reflare. See pic below
of completed installation!
These are the weld on hose brackets to replace the factory
hard line to the wheel cylinders. The calipers use a rubber hose which will
pass through these holes and have a "U" clip hold them in place.
You will have to shorten the factory hard line and reflare. See pic below
of completed installation!
 Here is an almost complete installation using the 80-5 Seville,
Eldorado, Riviera, Toronado rear brake calipers with e-brake lever. I have
not welded the hose bracket in this pic.
Here is an almost complete installation using the 80-5 Seville,
Eldorado, Riviera, Toronado rear brake calipers with e-brake lever. I have
not welded the hose bracket in this pic.
 Here is a 15" Buick rallye wheel mounted on the rear
axle to test caliper-to-rim clearance. Notice there is approximately 1/2"
clearance. Other kits that use the F-body (Camaro/Firebird) calipers, you
will need to use a file to trim the cooling fins to run stock 15" rims.
The later F-body set-ups use 16" wheels so the cooling fins are not
close on those newer models.
Here is a 15" Buick rallye wheel mounted on the rear
axle to test caliper-to-rim clearance. Notice there is approximately 1/2"
clearance. Other kits that use the F-body (Camaro/Firebird) calipers, you
will need to use a file to trim the cooling fins to run stock 15" rims.
The later F-body set-ups use 16" wheels so the cooling fins are not
close on those newer models.
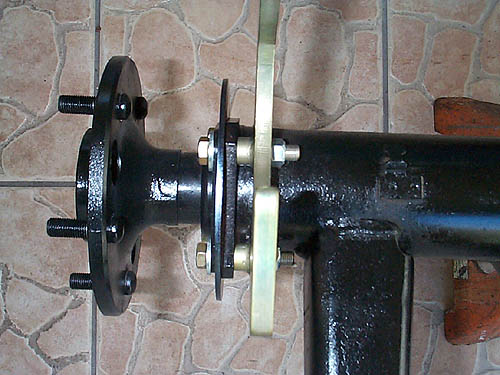
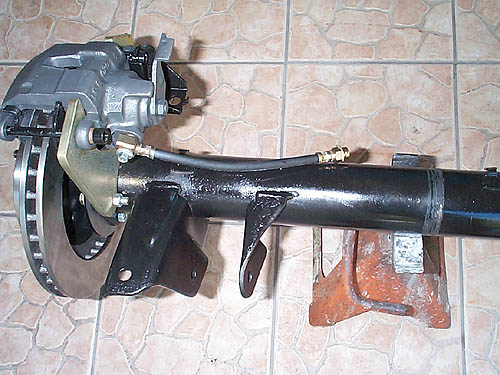
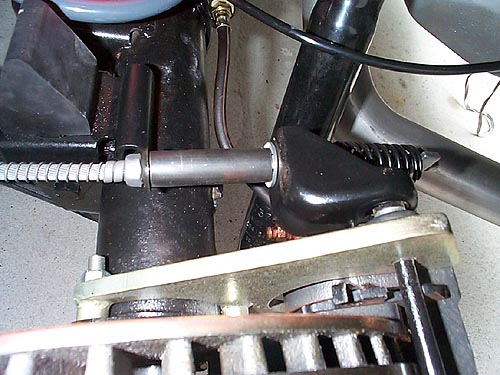
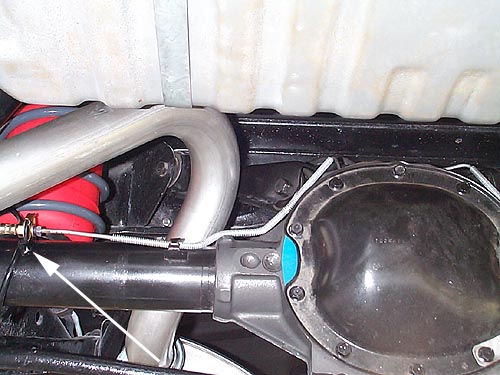 Here is the complete installation. Arrow indicates welded
on tab to hold new disc brake hose to hard line. You will need to shorten
the existing lines and re-flare the ends. Brake hose is Coni-Seal BH177024
which cross references to Wagner 97661, Midas 2320, EIS 5494, Bendix 77024,
Auto Spec 87011.
Here is the complete installation. Arrow indicates welded
on tab to hold new disc brake hose to hard line. You will need to shorten
the existing lines and re-flare the ends. Brake hose is Coni-Seal BH177024
which cross references to Wagner 97661, Midas 2320, EIS 5494, Bendix 77024,
Auto Spec 87011.
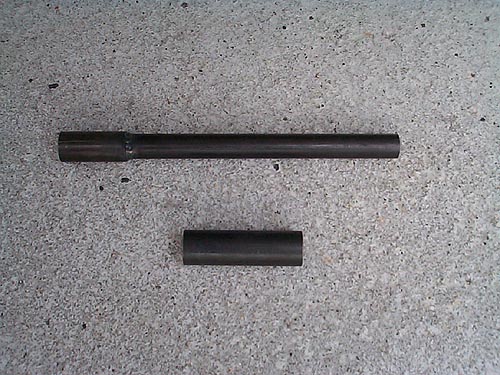 These are the e-cable spacers for the rear calipers. The
drum brake e-cables are longer than the non-original disc brake versions
so these remove the slack from the cables.
These are the e-cable spacers for the rear calipers. The
drum brake e-cables are longer than the non-original disc brake versions
so these remove the slack from the cables.
 The arrows indicate the approximate length dimension points
when installed on a rear drum brake car, about 3.5-3.75"
The arrows indicate the approximate length dimension points
when installed on a rear drum brake car, about 3.5-3.75"
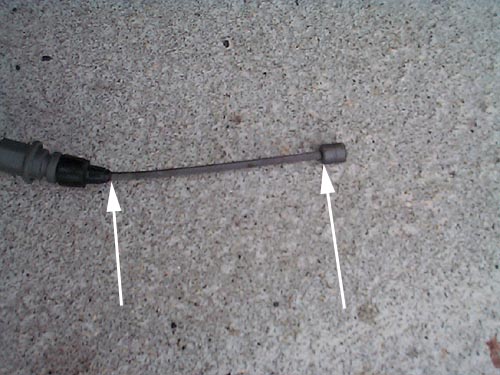
 Here is the one sleeve installed on the lower e-brake cable.
It is 2.5" long and required no trimming.
Here is the one sleeve installed on the lower e-brake cable.
It is 2.5" long and required no trimming.
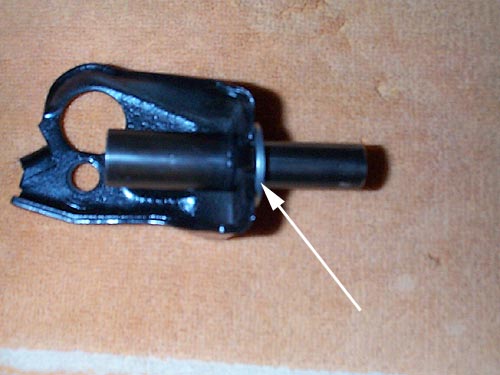 Here is the disc brake e-cable brkt removed from the caliper.
The sleeve has been shortened so the right side extends 1.375" from
the end of the bracket. The silver retainer is then installed using a 9/16"
deep socket and hammer to tap the retainer in place.
Here is the disc brake e-cable brkt removed from the caliper.
The sleeve has been shortened so the right side extends 1.375" from
the end of the bracket. The silver retainer is then installed using a 9/16"
deep socket and hammer to tap the retainer in place.
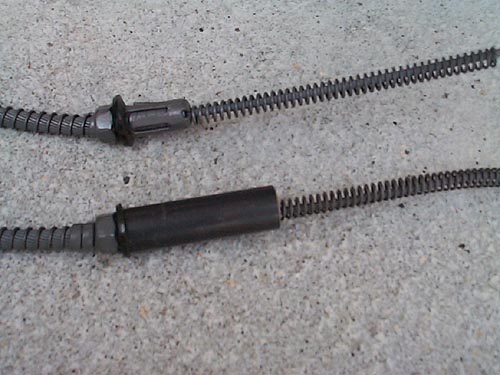
 Here is the cable installed with the large sleeve over the
smaller sleeve.
Here is the cable installed with the large sleeve over the
smaller sleeve.
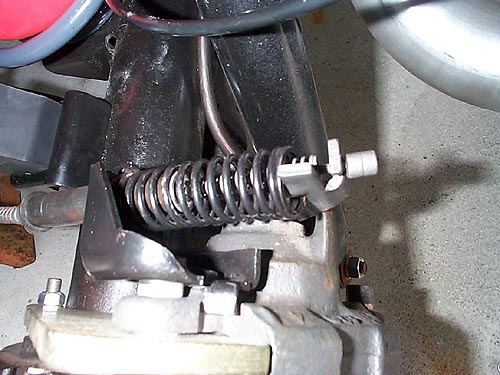 Here is the original Eldorado spring installed over the original
e-brake cable for proper e-brake
operation.
Here is the original Eldorado spring installed over the original
e-brake cable for proper e-brake
operation.