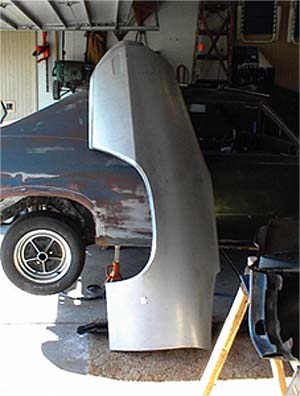
First a brief history on my car, it is a 70 GS 455 that I am in the process of restoring to mostly Stage 1 specs. I have owned this car since 1981. In 1983 I started a restoration project on the car. The restoration stalled from 1984 to 2000 when I resumed the project. So far the car has been sandblasted, I have installed a new trunk floor, new floorboards. I repaired the core support and front inner and outer fenders, and the right rear ¼ has been installed along with the repair of the wheel well and trunk extensions.
Since a lot of people have posted questions on rear ¼ panels
I decided this would be a good time for me to document the installation
of the left rear ¼ panel. I am not a body man but I do have 18 years
welding experience. Also my job allows me to have access to many of the
necessary tools. My goal here is to do as much of the rough bodywork as
possible. I will leave the final straightening of the body and the paintwork
to a professional.
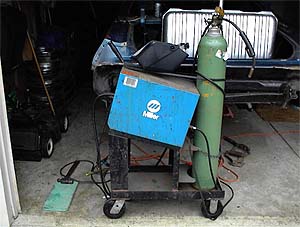
The main tools I used are as follows. 4 ½” electric hand grinder, wire, girding and cutting wheels for the grinder, 110v mig welder, I used .023 wire with 75-25 shielding gas, hammer and chisels, file, hacksaw blade, screw drivers, panel adhesive and applicator gun, 18 clamps, disk sander with 36 grit wheel panel flanger DA sander, spray gun, and saw horses.
I bought my rear ¼’s from Rolling Steel. I have not compared them to others available but I have heard complaints about the panels from some suppliers. The consensus seems to be that none of the rear ¼ patch panels are perfect but some are better than others. After reading how many people were disappointed with the quality of the ¼’s they bought I felt this was my best option. The benefits of the Rolling Steel panels are heavy gage steel, means less chance of warping, galvanized type coating so it will resist rusting, you don’t want to do this job again. The marker light is flanged but not punched out. They are made in the US. There is extra steel on the panel, which I will use to patch the wheelhouse lip. The extra steel on the edges is to prevent the panel from being distorted during shipping. Rolling Steel has the ¼ panels available for 68-69 and 70-72 GS and Skylarks.
Item Cost
L & R rear ¼ panels $350
L & R Chevelle trunk extensions $78
3 spools .023 welding wire $21
20 4 ½” cutting wheels $40
2 4 ½” grinding wheels $4
Wide panel flanger $30
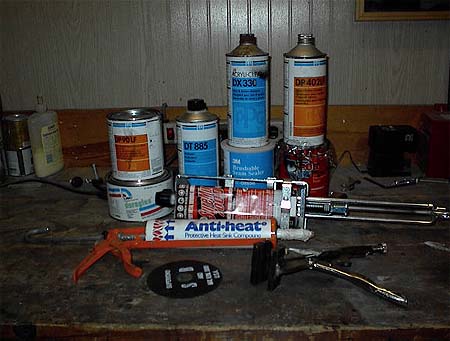
Anti Heat $10
PPG DP 90 $32
DP 402LF catalyst $18
DT reducer $13
3M brushable seam sealer $26
Panel adhesive $30
Panel adhesive applicator gun $50
2 cans undercoating $6
Duraglass $8
POR 15 $30
******
Total $746
The first thing you need to decide is how much of the ¼ needs replacing.
The rust is almost always going to be more than you think. My car sat stored
in a garage for 16 years and it was amazing how much more it had rusted than
when I parked it.
There are two schools of thought on the replacement. One is to only replace
as much as you need to. This will keep the repair work lower, which will
mean the bodywork should be less noticeable. The other is to replace most of
the ¼. This is what I did since the rust was up to the bodyline in back and
there were traces of bondo 6” above the wheel opening. The bondo was due to
previous repair work done to the rear ¼’s. I felt this meant the original
shape of the body would be distorted and it would be difficult to try to
match an imperfect ¼ patch with a distorted body. Whichever way you chose to
do the repairs you will basically use the same techniques.
When you have decided how you are going to replace it is time to start by
taking some measurements. Have the car in a place where it can stay without
moving it because the measurements you take will be your reference points
for installing the new panel. Jack the car up in the back end high enough
so you can work under it when necessary. Preferably it will be on a garage
floor. On a piece or paper you may want to make a sketch of the rear ¼ and
mark the following measurements. Measure from the bodyline at the back of
the ¼ to the ground. Measure the bodyline to the ground at the rear of the
wheel opening. Measure the center bottom of the wheel opening to the ground.
If possible measure the bottom of the trunk extension to the ground at the
front and rear of the trunk extension. Measure the width of the wheel
opening lip. If your new panel does not have the marker light punched out
you should make a template with some cardboard to transfer to the new panel.
Depending on how much steel you have left on your car you may want to take
some measurements from another car with the original ¼ panels on it. That
way when you trim your replacement panels they will look correct.
You can now start trimming off some of the extra metal from the new ¼. I cut
back from the doorjamb area 1”. I cut the back the lip that fits above the
rocker panel to ¾”. I also had to put a relief cut between the area above
the rocker panel and wheel well lip. The reason was that the panel did not
sit down enough on top of the rocker. By making a relief cut I was able to
bend the lip with an adjustable wrench until I got it to fit correctly above
the rocker panel. I then welded the relief cut. You can cut the hole for the
marker light. Use your template to transfer to the new ¼. Use the cutting
wheel and cut the opening from the backside of the ¼. You will probably not
be able to cut all the way to the corners with the cutting wheel. You can
use a hacksaw blade to finish the cut. Smooth the edges with a file and
check the fit of the marker light. I cut the panel down from the top edge
1 ¼”. I also cut the back of the ¼ above the bumper 1¼”.
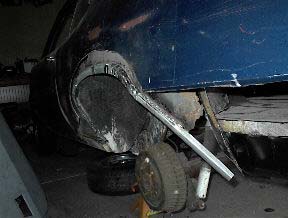
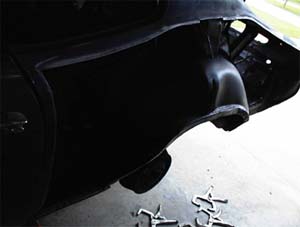
Initial cut of old metal on left side. Repair work
 Section cut off of left side showing rust damage and
has started on the lip of outer wheelhouse previous repair work.
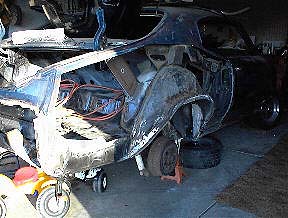
It is now time to start cutting off the old metal. Use the hand grinder
with a cutting wheel. Begin cutting a section out 2” behind the doorjamb
about 4-6“ above the top of the rocker. Continue around the wheel about 4”
above the wheel opening. Cut the back portion of the ¼ below the bodyline.
The best way to use the cutting wheels is to make a cut into the sheet metal
and than go back over it until you have cut all the way through. About 3-4
passes should do it. When you have removed this section of old metal out you
will be able to see the extent of the repairs necessary. In my case on the
right side I had to patch the back of the rocker, replace the outer wheel
house lip and the back of the outer wheel house, and replace the bottom of
the trunk extension before I could replace the rear ¼. The left side was
much worse. I had to do the same repairs as the left side but I also had to
use an inner wheelhouse repair patch, repair the front and rear bottoms of
the inner and outer wheelhouse. Plus patch a larger section of the rocker
panel.
Trunk ext. tacked in place, left side    Left side trunk extension welded on
                                         Repairs made behind extension and
                                         on bottom of wheelhouse

Since I only needed to replace the bottom portion of the trunk extension I
decided to use a Chevelle trunk extension rather than a Buick. They are
different but the bottom portion is close. The Buick extensions are
available but they are a little more money.  Another thing to consider is
that this is an area that no one will see. Since my car will be a driver
I saved some money here. I cut the useable portion out of the Chevelle trunk
extension. Then I placed it over the rusted part of the trunk extension to
get an idea of how much I need to cut out. Remember to check your
measurements to the ground so the bottom of the trunk extension will be in
the correct location. Once you finish grinding it to size weld the patch in
place. I also will have to replace some rusted metal in back of this patch
but I will fabricate what I need. After the patches are installed you can
grind the welds, fill the seams with body filler, and smooth them out. Again
it is unlikely anyone will see this but I still wanted it to look good.
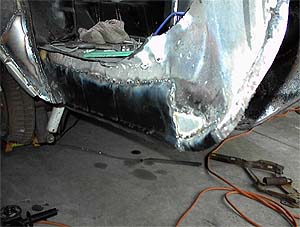
    Repaired outer wheelwell lip			 Same side showing the back part
          on the right side.              of wheel house and the trunk ext.
      					                           This was the good side!

Currently replacement outer wheelhouses are not available for Buicks. I have
heard that either Chevelle or Olds ones can be used with modifications but I
do not know what modifications are needed. I assume it would include the fit
of the outer lip. It would have been nice to have an outer wheelhouse for
the left side because the repairs I had to make took a lot of time to
complete. Since my car will be a driver, and this is another area that no
one will see, my best option was to repair the outer wheelhouse. I had no
problem removing the old ¼ because the lip area was rusted through. I will
replace it by cutting it out and replacing it in sections. This will allow
you to get the lip as close to the original location as possible. Also by
not cutting the old ¼ too high above the wheelhouse allows you to visualize
the correct location of the wheelhouse lip. Since the wheelhouse lip has a
curved radius you may have to make some relief cuts in the pieces to get
them the right shape.

Next I had to make a repair patch for the back of my rocker panel on the
right side. I had to patch 2 sections on the left side. When I had the hole
cut in the rocker I blew out all the debris. I coated as much of the inside
of the rocker as I could with POR 15 to prevent further corrosion.
Repair patch made on left side rocker panel.
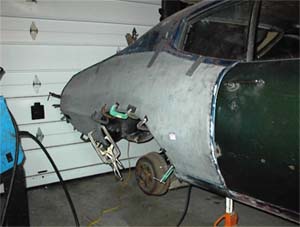
Now it is time to do some test fitting of the replacement panel to get an
idea of where to make the cuts. It helps to have someone assisting you so
the panel can be held in place while it is marked. Be very careful handling
the replacement ¼, as you do not want to put and dents or creases in it.
Remember to check your measurements to make sure it is in the correct
location.

Now it is time to make a rough cut in the old sheet metal to get it close
so the ¼ will fit. The way I did it was to have butt weld seems behind the
doorjamb and in back above the bodyline. The top part of the body going
horizontally will be a flanged so I can do a lap weld. This weld should be
stronger plus flanging the body will reduce warping. Having a flange on the
makes it a lot easier to fit the panel in place. The flange will be 1” down
from the top so it is barely noticeable when looking in the trunk opening.
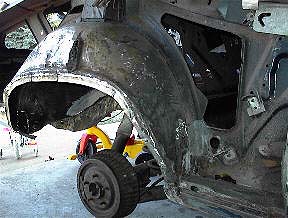
     R.side showing final cut.        L. side showing tape used as guide
                                         for cutting.
Mark an outline of the new panel over the body using a pencil or soapstone.
Then I used some ¼” masking tape to enhance the lines so I would not go off
track when cutting. Be careful not to cut off more than you need to. You may
want to cut on the inside of your line or about 1/8” inside your line to be
safe. I made the vertical cuts before I made the horizontal cut. I made the
horizontal cut last. After I had the vertical cuts made I placed the panel
back on the car and marked a line for the top horizontal cut. Since I wanted
a ¼” lip for the flange I used the ¼” masking tape and put the tape below
the line so the cut along the top would be ¼” below the top of the new panel.
You can always keep cutting off more until you get it right or use your
grinder to remove extra metal. It is much easier to cut off more than it is
to have to replace metal or weld large gaps!

Be careful when cutting behind the doorjamb. There is an inner brace that is
behind the old ¼ panel. You do not want to cut through the brace so make
light cuts until you only cut through the outside layer of sheet metal. This
brace will help you line up the new ¼ panel. There is also a brace above the
wheel well area so be careful when cutting this area.

After you have made your rough cuts you should place the ¼ on the car and
check the fit. Continue to trim one area at a time to get the panel to fit.
I ended up grinding down the areas that were spot-welded and use a hammer
and chisel to remove the excess metal. Remember to check the wheelhouse lip
and trunk extension. You want those to fit flush with the new ¼ panel so
the adhesive will bond. You may need to bump the lip out or in with a hammer
or you can use an adjustable wrench to pry the lip. I used a couple of clamps
to hold the bottom in place and 3 strips of duct tape to hold the top.
Remember to check your measurements so the new ¼ panel is in the correct
location. Repeat this process until you are close. I think I had each panel
on and off the car about 10 times until I was sure I had the fit exactly how
I wanted it.

This is a good time to remove the rear side window. It is easy to do with
the ¼ panel off the car. Removing it will prevent over spray that will have
to be cleaned later.

Now it is time to flange the top part of the body. You may want to sand down
to bare metal first since it will be easier to do before you put a flange in
the body. I used a wide flange tool from the Eastwood Company. It is just a
Vise Grip with some dies welded to the jaws. If you are real handy you could
probably make your own. The brace below the rear roof pillar interferes
with the flanging tool. In this area I did not put a flange and will just
butt-weld the seam.
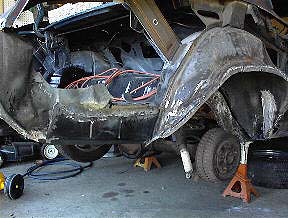
View of wheelhouse with DP 90 applied. Note 	Back view with repairs made
and DP 90 applied.

Notch cut on top where panel flanger can't reach. 	Bare metal on edges is
for adhesion of metal bonding epoxy.
I decided to use PPG DP 90 epoxy primer to protect against future corrosion.
This will leave a semi-gloss black finish. The trunk area can later be top
coated with the correct splatter paint. I masked off the areas where the
panel adhesive was going to be used and sprayed the wheelhouse and trunk
extension area. I put the ¼ panel on the sawhorses, taped off the areas
where the adhesive will be used, and sprayed the inside. Make sure you prep
the areas first by scuffing with a scotch brite pad and using a good wax and
grease remover. After the primer has cured you can reinstall the window.

The panel adhesive I used requires a bare metal surface roughed with a
30-40-grit for proper bonding. I used the disc sander on the wheelhouse
lip and hand sanded the hard to reach areas including the inside of the new
¼. I used Dominion Sure Seal panel adhesive. There are other good products
available. You will have to also buy the correct applicator gun to go with
the adhesive. One tube was enough to do both sides but you would need two
mixing tubes if you were replacing one side at a time. I used the panel
adhesive on the back of the trunk extension all the way down along the
wheelhouse lip and at the bottom front of the ¼ panel above the rocker.
By doing this I am not only bonding this area but I am also putting a
watertight seal. You could weld the bottom portion instead but I felt the
adhesive was an easier route to go. It offers good strength with minimal
work involved.

This is probably a good time to list some of the problems I ran into.
As mentioned earlier there is extra steel on these ¼’s that needs to be
trimmed. The area that fits above the rocker panel will have to be trimmed.
The bend in this area is not correct so you will also need to bend it some
more to get it to fit correctly. On the right side I had to trim the very
back portion of the trunk extension 3/16” to get the panel forward enough
so it would line up. Everything else on the right fit nicely. On the left
side I had more problems. I put my trunk extensions in the exact place as
they were originally. On the right side the rear ¼ hung a little lower then
the extension. On the left side the trunk extension hung about 1/8” lower
than the rear ¼ so I had to trim the extension back to make it look right.
Also the area in the very back above the trunk extension did not line up
well on its own. It took a little more persuasion to get everything to line
up the way I wanted it to. I am not saying these problems were due to the
rear ¼’s. They could have been in the way the car was manufactured. Just be
careful when doing the installation so you make as few mistakes as possible.
When you are sure your panel will fit correctly it is now time to install
it. It is a good idea to have some help but I was able to do this by myself.
First I ran a bead of panel adhesive ¼”-3/8” thick on the car along the
bottom. Then I put the panel in place and used the duct tape to hold the
top. I then proceeded to clam the panel along all the lower areas. The trick
is to have the clamps snug but not too tight. You do not want to see the
adhesive squirting out from the joints. The adhesive usually has a working
time of 1-2 hours so take your time and get it right. Remember to check your
measurements. I used some rubber conveyor belt pieces under the clamps so
I would not make dents in the new panel.
    Right side ¼ panel clamped and tack welded in place waiting for panel
adhesive to dry.
Once you have the bottom portion in place you should begin tack welding the
sides of the panel. Proceed by working your way up from the bottom and
putting tacks on the sides. Make sure the ¼ panel is perfectly lined up with
the body when you tack it. This will reduce the amount of filler you will
need to use. Use a small flat blade screwdriver to help line up the panels.
Don’t weld too close to the adhesive because it may be flammable. When you
have the sides tacked you can tack the horizontal seem at the top using as
many tack welds necessary to have the panel in the correct place. Once it is
in place and you are satisfied with the fit let it set up for a day before
removing the clamps.

After the adhesive has cured you can remove the clamps. It is now time to
start the welding process. I used a .023 wire with shielding gas but you
could probably get by with .030-flux core wire if you have to. You will
need to be more careful not to heat up the metal and it will require more
grinding to get the slag off. The best trick I used was to use Anti-Heat to
absorb the excess heat. Anti-Heat comes in a caulk tube and you should be
able to get it at a good welding shop. Put a bead of Anti-Heat on both sides
of the area you are going to weld as close as possible. Be careful as the
Anti-Heat can be somewhat runny and you do not want it to get into the area
you will be welding. I welded small beads about ¾”. When you do this, the
Anti-Heat will instantly dry up as it absorbs the heat produced by the
welder. Take your time welding and make sure you stager the areas so you
will not put too much heat in the same place. If you heat the panel
excessively and it warps you will have wasted all this effort so once again
please be careful and take your time!

After the welding is complete go over the welds with your grinder and take
them down to the surface. You can than follow up with the disk sander. To
fill your seems use a body filler that is reinforced with fiberglass for
strength. Some people recommend applying epoxy primer first before the
filler. After the filler is smoothed use a good 2-part glazing putty to get
the seams smooth.

Next you can go over the seams in the back and under the wheel well with
the 3M-seam sealer. You can use the spray cans of undercoating to touch up
the inside of the wheel well and the outside of the trunk extension. The
final part is to trim the wheelhouse lip and bottom of the ¼ panel under
the trunk extension to get the right contour. Drill the holes for your
wheel molding and you are all set. Good Luck!