Buick 455 Oiling Modifications
By Gary Fanning and Dave Knutsen
Photos by Gary Fanning
*** Please wear safety glasses
for all these procedures. It's always a
good idea to have a second pair of hands and eyes for guidance (and safety).
Please feel free to check with Buick experts on the e-mail list for their
particular methods on modifications and other tips.
These photos are of a '73 block on a stand upside down.. main bearing
saddles up. Keep in mind that the '73 block has larger passages than
earlier blocks so the pre-drilled measurements here are slightly larger.
I
used cobalt drill bits. They're quite expensive so titanium would be
sufficient, but at least be sure to use new, sharp bits... and go SLOW,
pull
the bit back to clean shavings frequently. Use a shop vac to keep the
journals clean and a gun bore light to view progress and results.
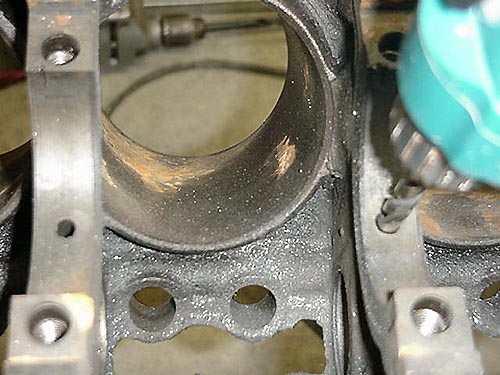
This one is #2 Main bearing to cam bearing. I was told all but the #1
journal were 1/4" and #1 was 3/8" but on the '73 block here the
#1 was 7/16"
and the rest were 5/16". All this means is that I took out 1/16"
instead of
1/8". The same size drill bits can be used for all blocks.
You can see the #3 on the left side and the 5/16" hole.
#1 main bearing journal I did nothing. #2 - #5 I drilled from 5/16"
to
23/64". The 23/64" saves a little more metal in the cam bearing
saddle than a 3/8" bit would but still allows increased oil flow. Drill
this all the way through to the cam bearing saddle and into the main lifter
galley. After this modification, you definately need to use the fully grooved
cam bearings, not because of the full groove, but rather because they are
wider than the stock #2,3,4,5 bearings and will seal up the oil passage
from the now larger slot going through the cam journal.
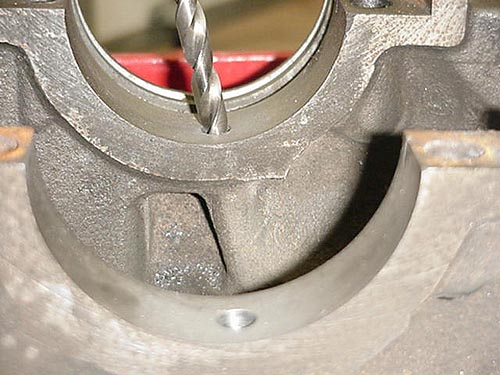
The #5 main bearing saddle to cam bearing seat I took out to 3/8".
There is
lots more meat in this saddle so it seems less stressful. Notice the
journal hump below the drill bit. This is the path the bit must follow.
Be
especially careful on your left/right alignment so you don't go through
this
area.

I drilled the main oil passage from the send unit to the
#1 cam bearing
seat, being especially careful to stop short of the cam bearing seat. I
drilled to 7/16" first and followed with 1/2" bit ($25 EACH).
I used a 'bore
light' that I picked up at a gun shop.. works great. I could easily see
the
progress of the drill bit. The white tape is extra precaution.. measured
to
max depth I wanted to go before reaching the cam seat. Also, placed a shop
vacuum on the hole to this journal to keep shavings out of the drill and
journal. This is another area where left/right allignment is critical.
I've heard of cases where the drill bit has gone astray and punched through
the block. It can be fixed but extra caution will help you avoid that sick
feeling. Use a 3/8" NPT tap to re-thread for your send unit. Then simply
buy a 3/8" NPT fitting to adapt to your particular send unit thread
size,
usually 1/4".
The journal from the #1 Main saddle also intersects with these and
can be
drilled to 3/8" on some of the older blocks but the '73 was already
7/16"..
no action required.
That is a 12" Titanium or Cobalt drill bit and required a 1/2"
drive
electric drill. Be careful here; the bit really can take off through the
block. Go SLOW to avoid binding of the bit.. especially with the 1/2"
drill.. it will take your arm off if it binds.
The timing cover main passage can be enlarged to either 1/2" or 9/16".
The
Dove book recommends 9/16". This is a 1/2" bit. I might move to
the 9/16"
after further inspection.
Depending on who you talk to it may or not be recommended to drill the
passenger side lifter galley through to enlarge it. It tapers about halfway
back. I decided not to do it even though I have no plans for a roller cam.
According to TA Performance, "One of the big problems with drilling
it all
the way is that when running a roller cam, the roller on the lifter becomes
exposed into that oil gallery. Then there will be a loss of oil pressure.
On
flat tappet cams it's not that big a deal."