Heater Core Removal and Replacement
by George Nenadovich
To remove a heater core takes some patience and simple hand tools.
In order to remove the heater core both hoses, source and return need to
be removed. One hose is 5/8" and other is 3/4". If you have the
factory spring clamps, discard those and use worm drive clamps. Car should
be cold and you can drain the radiator to drop the coolant level below the
height of the heater core hose fittings to avoid spilling coolant. Remove
the hose clamps from the heater core fittings. Now would be a good time
to replace the hoses so use n utility knife to slit each hose the length
of the hose fitting and rotate the hose to break the hose loose. Disconnect
the hoses from the water pump and intake since you will be installing new
hoses.
From inside the car, remove the central duct (located directly above
the trans floor hump) that connects to the air box by removing the sheet
metal screws(3/8" hex), one per side.
Now the fun part begins!
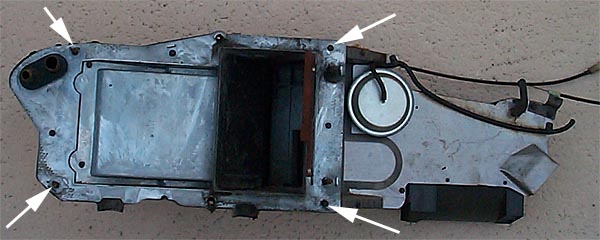 The white arrows show the 4 studs that go through the firewall
and the nuts must be removed in order to remove the air box. The nuts are
7/16" and are fairly easy to remove. Leave the top two for last and
work on the lower ones first. For the one on the bottom left, go through
the RF fenderwell after you have removed the tire. Use a long extension
on a 3/8" drive ratchet to reach the nut. The nut on the lower right
is a major pain to remove since you can not easily reach it with an engine
in the way. There is very little room between the pass. side head/exhaust
manifold and firewall to place a tool or your hand to get to the nut. Use
a box end ratchet wrench to remove this nut. Do not be surprised if this
nut is missing. Many mechanics leave this nut off.
The white arrows show the 4 studs that go through the firewall
and the nuts must be removed in order to remove the air box. The nuts are
7/16" and are fairly easy to remove. Leave the top two for last and
work on the lower ones first. For the one on the bottom left, go through
the RF fenderwell after you have removed the tire. Use a long extension
on a 3/8" drive ratchet to reach the nut. The nut on the lower right
is a major pain to remove since you can not easily reach it with an engine
in the way. There is very little room between the pass. side head/exhaust
manifold and firewall to place a tool or your hand to get to the nut. Use
a box end ratchet wrench to remove this nut. Do not be surprised if this
nut is missing. Many mechanics leave this nut off.
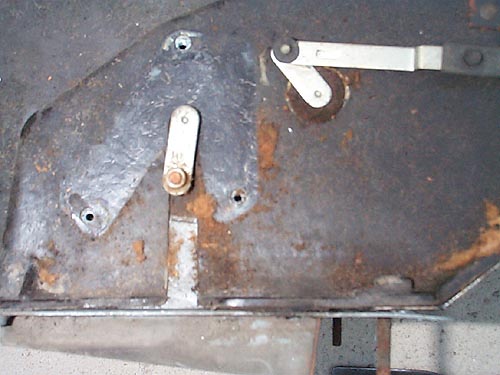
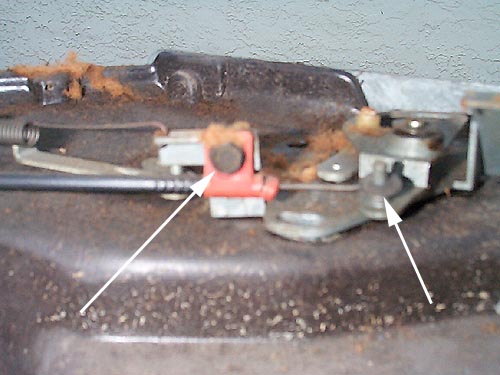 This is the heater control cable that contols hot/cold from
the ac controller located in the dash cluster. You will need to remove this
cable before trying to remove the air box from under the dash. Remove the
retaining spring nut on the right with a pair of needle nose pliers. Be
careful not to lose this nut. Next, remove the screw (5/16") shown
with the arrow on the left. Now gently pull the unit from the inside of
the car as someone watches the studs so the threads do not get caught on
the firewall.
This is the heater control cable that contols hot/cold from
the ac controller located in the dash cluster. You will need to remove this
cable before trying to remove the air box from under the dash. Remove the
retaining spring nut on the right with a pair of needle nose pliers. Be
careful not to lose this nut. Next, remove the screw (5/16") shown
with the arrow on the left. Now gently pull the unit from the inside of
the car as someone watches the studs so the threads do not get caught on
the firewall.
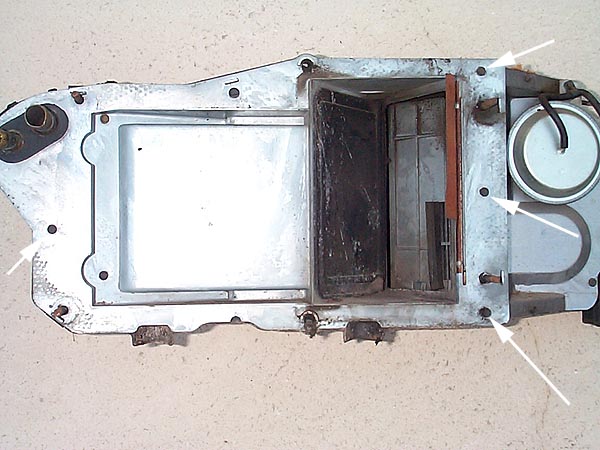
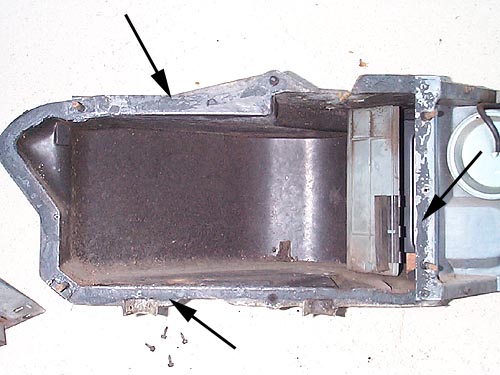
 This is the top of the air box. The white arrows indicate
the screws that need to be removed in order to remove the heater core from
the air box.
This is the top of the air box. The white arrows indicate
the screws that need to be removed in order to remove the heater core from
the air box.
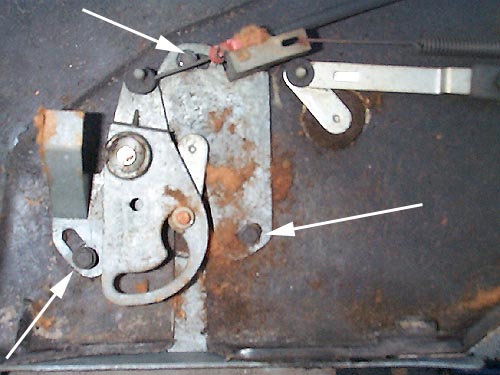
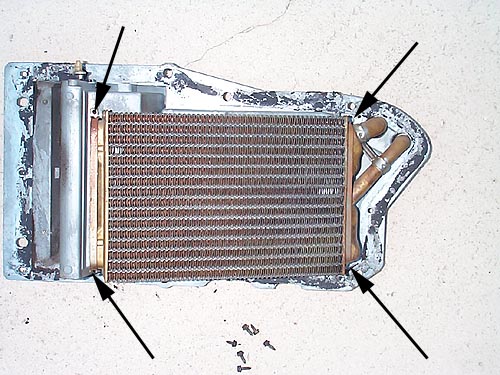
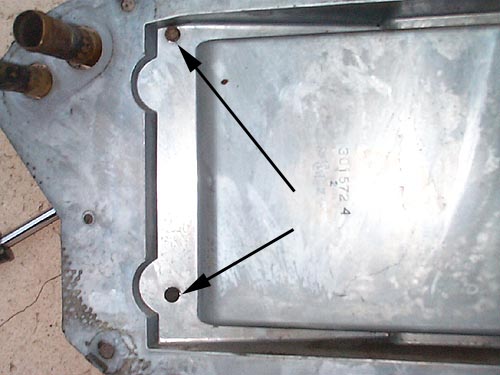
 Here is a close up of the air box with the arrows indicating
the 4 screws(1/4" hex) that hold the cover in place. Remove these along
with the screws from the top. (Previous picture) Remove the rubber gasket
from the two hose fittings so the fittings can slide through the metal cover.
Here is a close up of the air box with the arrows indicating
the 4 screws(1/4" hex) that hold the cover in place. Remove these along
with the screws from the top. (Previous picture) Remove the rubber gasket
from the two hose fittings so the fittings can slide through the metal cover.
 Here is the air box with the cable mechanism removed. The
cover now needs to be removed from the air box. Gently pry the metal cover
from the fiberglass box with a large putty knife.
Here is the air box with the cable mechanism removed. The
cover now needs to be removed from the air box. Gently pry the metal cover
from the fiberglass box with a large putty knife.
 Here is the metal cover w/heater core still attached. There
are 4 screws (1/4") hex head that hold two straps in place that will
need to be removed.
Here is the metal cover w/heater core still attached. There
are 4 screws (1/4") hex head that hold two straps in place that will
need to be removed.
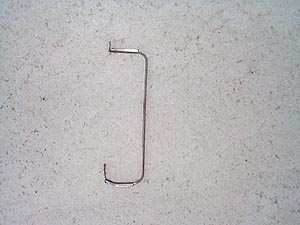 This is one of the two straps holding the heater core in
place.
This is one of the two straps holding the heater core in
place.
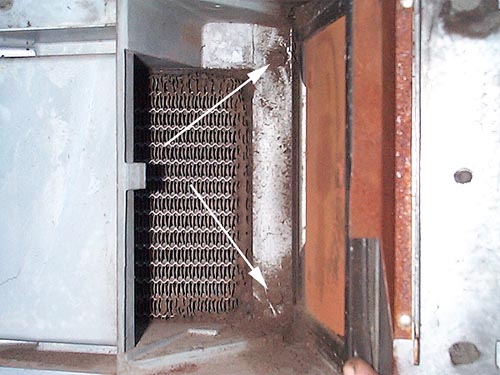 Move the air door so you can see these two screws which hold
one strap in place. Remove the screws. Notice the dirt inside the air chamber,
this needs to be cleaned. This is unit is from a 68 GS400 which is not too
dirty for a 35 year old car.
Move the air door so you can see these two screws which hold
one strap in place. Remove the screws. Notice the dirt inside the air chamber,
this needs to be cleaned. This is unit is from a 68 GS400 which is not too
dirty for a 35 year old car.
 These are the two other screws holding the other strap in
place. Remove these.
These are the two other screws holding the other strap in
place. Remove these.
 This is the empty air box, notice the residue from the old
sealant still on the box. Remove with a putty knife followed up with a wipe
down with mineral spirits. (Now is a good time to clean the air box out
to remove dust/dirt/lint etc.) Do the same on the metal cover plate, both
sides. Also clean the firewall from the passenger compartment to have clean
mating surfaces for a good seal. Visit an automotive store and purchase
new sealant material. I like to use a product called "dum dum"
which comes in a roll between waxed paper and looks just like the butyl
windshield sealer. You may be able to find a similar product at Home Depot
called "finger caulking" which is white instead of black. You
want to apply an 1/8" bead between the box and metal cover plate and
then another bead between the cover plate and firewall. You don't want air
leaks around the air box perimeter. Now, reverse the process and reinstall
the cleaned air box w/new heater core and seals.
This is the empty air box, notice the residue from the old
sealant still on the box. Remove with a putty knife followed up with a wipe
down with mineral spirits. (Now is a good time to clean the air box out
to remove dust/dirt/lint etc.) Do the same on the metal cover plate, both
sides. Also clean the firewall from the passenger compartment to have clean
mating surfaces for a good seal. Visit an automotive store and purchase
new sealant material. I like to use a product called "dum dum"
which comes in a roll between waxed paper and looks just like the butyl
windshield sealer. You may be able to find a similar product at Home Depot
called "finger caulking" which is white instead of black. You
want to apply an 1/8" bead between the box and metal cover plate and
then another bead between the cover plate and firewall. You don't want air
leaks around the air box perimeter. Now, reverse the process and reinstall
the cleaned air box w/new heater core and seals.