How To Recover Bucket Seats
by George Nenadovich
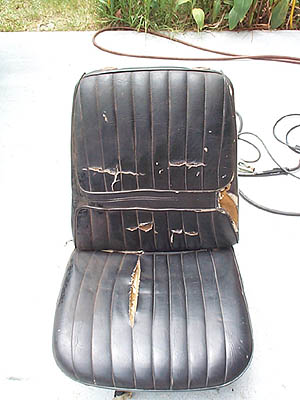 Here is a bucket seat that is going into a 72 Skylark coupe
that had a bench seat. This particular seat came from a 1972 Cutlass. The
headrest was missing and the rest of the seat is in good condition. These
seats can be found in GM A-bodies from 1968-72 including Cutlass/442, Chevelle/SS,
LeMans/GTO, 70-2 Monte Carlo, 70-2 Grand Prix and X-body 68-72 Nova. They
can also be found in full size cars(B-body) such as Rivera, Toronado, Wildcat
but the legs will have a different configuration. In order to place buckets
in a bench seat car, you will need to order the bucket seat brackets to
weld to the floor. Power bucket seats use different floor brackets than
manual seats.
Here is a bucket seat that is going into a 72 Skylark coupe
that had a bench seat. This particular seat came from a 1972 Cutlass. The
headrest was missing and the rest of the seat is in good condition. These
seats can be found in GM A-bodies from 1968-72 including Cutlass/442, Chevelle/SS,
LeMans/GTO, 70-2 Monte Carlo, 70-2 Grand Prix and X-body 68-72 Nova. They
can also be found in full size cars(B-body) such as Rivera, Toronado, Wildcat
but the legs will have a different configuration. In order to place buckets
in a bench seat car, you will need to order the bucket seat brackets to
weld to the floor. Power bucket seats use different floor brackets than
manual seats.
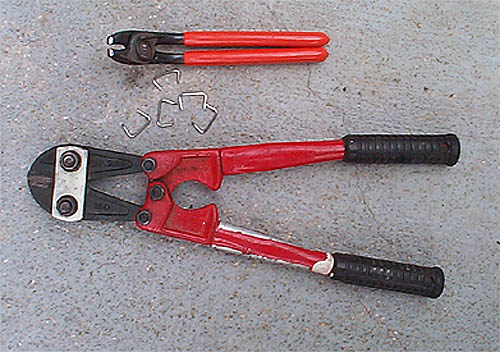 Here are some simple hand tools required to recover the seats.
The top tool is hog ring pliers. These are special pliers for bending the
hog rings into a circle. When you buy the rings they are shaped like the
letter "C". The bottom tool is chain (bolt) cutters to remove
the old hog rings.
Here are some simple hand tools required to recover the seats.
The top tool is hog ring pliers. These are special pliers for bending the
hog rings into a circle. When you buy the rings they are shaped like the
letter "C". The bottom tool is chain (bolt) cutters to remove
the old hog rings.
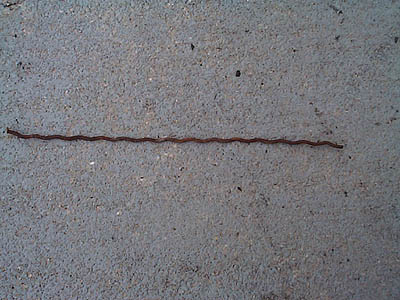
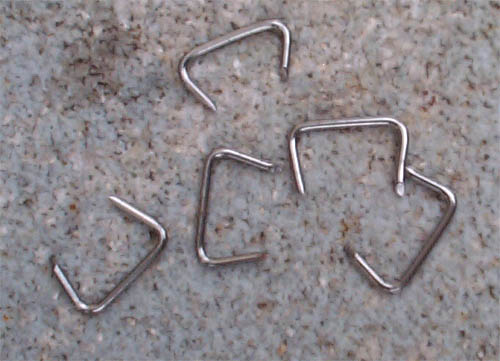 Here is a close up of the hog rings. You can buy these from
most aftermarket A-body suppliers or any auto trim shop.
Here is a close up of the hog rings. You can buy these from
most aftermarket A-body suppliers or any auto trim shop.
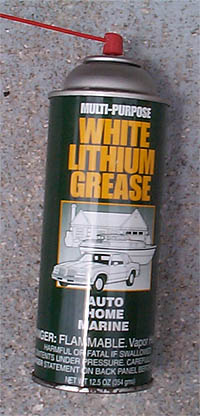 This is some spray grease that I use to lubricate the sliders.
Each slider has four ball bearings. Spray grease on each one to ensure smooth
sliding action!
This is some spray grease that I use to lubricate the sliders.
Each slider has four ball bearings. Spray grease on each one to ensure smooth
sliding action!
 Remove the lower plastic skirts. Each is held in place by
three Phillips screws, two on the front and one on the lower rear side.
Remove the chrome push button seat back release from the upper plastic back
plate. Use a large flat blade screwdriver or large putty knife to gently
pry up the button. With the button removed, you will see two screws that
need to be removed. Also on the bottom edge just to the right of the upper
back cushion guide will be another Phillips screw. Remove that screw and
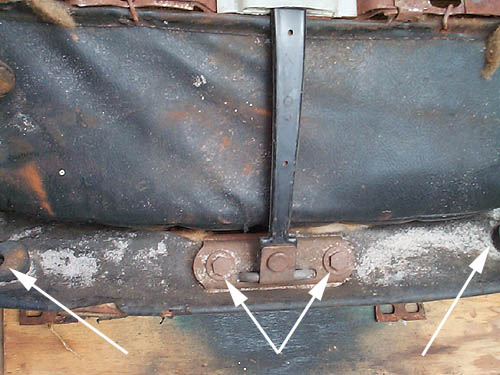
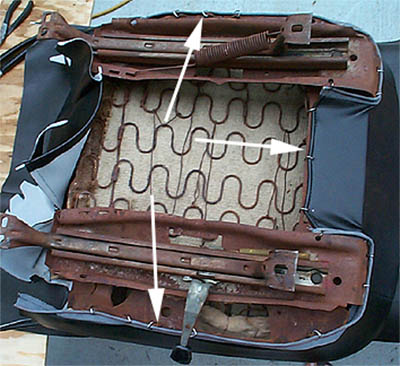
slide the plastic back panel up. On the the lower seat cushion as shown
above, remove the two rubber bumpers shown by the far left and far right
arrows. They are held in place by a Phillips screw. Now, remove the upper
cushion retainer strap, center arrows, it is held in place with two 7/16"
hex head screws.
Remove the lower plastic skirts. Each is held in place by
three Phillips screws, two on the front and one on the lower rear side.
Remove the chrome push button seat back release from the upper plastic back
plate. Use a large flat blade screwdriver or large putty knife to gently
pry up the button. With the button removed, you will see two screws that
need to be removed. Also on the bottom edge just to the right of the upper
back cushion guide will be another Phillips screw. Remove that screw and
slide the plastic back panel up. On the the lower seat cushion as shown
above, remove the two rubber bumpers shown by the far left and far right
arrows. They are held in place by a Phillips screw. Now, remove the upper
cushion retainer strap, center arrows, it is held in place with two 7/16"
hex head screws.
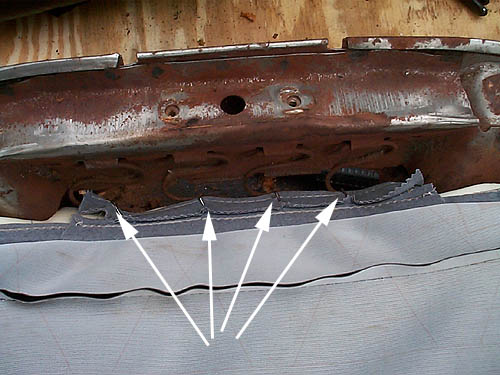
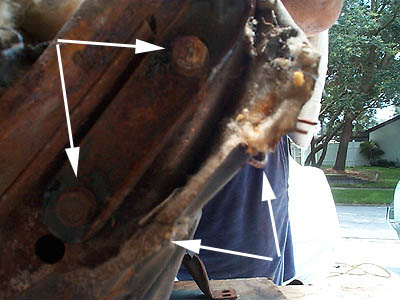 Cut the hog rings indicated by the the right lower arrows
with the bolt cutter. This will reveal the side hinge screws, 1/2"
hex head. Remove the screws on both sides and set aside the upper cushion.
Cut the hog rings indicated by the the right lower arrows
with the bolt cutter. This will reveal the side hinge screws, 1/2"
hex head. Remove the screws on both sides and set aside the upper cushion.
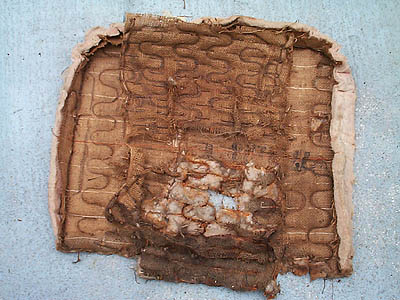 Now go around the lower seat cushion perimeter and cut all
hog rings. Remove the seat cover and old foam. Pictured above is the burlap/cloth
cover that rests between the foam and springs. This one is shot and will
be replaced. Best solution I have found is to use a piece of house carpet
that has a burlap or jute backing. Now is the time to inspect all springs
and make repairs. You can buy replacement spring kits if needed.
Now go around the lower seat cushion perimeter and cut all
hog rings. Remove the seat cover and old foam. Pictured above is the burlap/cloth
cover that rests between the foam and springs. This one is shot and will
be replaced. Best solution I have found is to use a piece of house carpet
that has a burlap or jute backing. Now is the time to inspect all springs
and make repairs. You can buy replacement spring kits if needed.
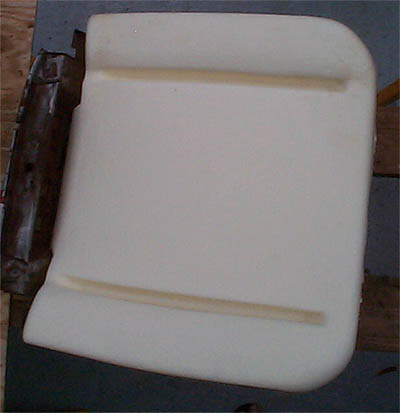 Here is the new lower seat cushion foam. If your seats are
original, you should replace the foam due to age and wear. Putting new covers
over old foam will not feel like a new seat and may not fill the seat covers
to give a smooth finished look, you do not want the seat covers to be lumpy
or wrinkled.
Here is the new lower seat cushion foam. If your seats are
original, you should replace the foam due to age and wear. Putting new covers
over old foam will not feel like a new seat and may not fill the seat covers
to give a smooth finished look, you do not want the seat covers to be lumpy
or wrinkled.
 Here is the lower seat cover put in position and anchored
to the seat springs. This is your starting point for installing the hog
rings. On new seat covers, the seam has a plastic rod sewn in place. On
the old covers, there is a corrugated rod. If your new covers do not have
the plastic rod, you will have to reuse your old one. So, don't throw out
your seat covers until you complete the seats.
Here is the lower seat cover put in position and anchored
to the seat springs. This is your starting point for installing the hog
rings. On new seat covers, the seam has a plastic rod sewn in place. On
the old covers, there is a corrugated rod. If your new covers do not have
the plastic rod, you will have to reuse your old one. So, don't throw out
your seat covers until you complete the seats.
 This is the orignal corrugated rod as discussed above.
 Here is the lower cushion flipped upside down. The middle
arrow or right arrow shows the next anchor point that has to be installed
with hog rings. After completing these three hog rings, work your way around
the perimeter making sure you have no wrinkles. Also, notice the carpet
on the seat springs that replaced the old burlap that was worn out. These
section is done. Notice the loose material on the left. This must be left
alone until the upper seat cushion is attached to the lower section. The
material will cover the hinge bolts and give a smooth finished look to the
seat. Use hog rings to cover the hinges, only two are required to join material
sections. The last item to install is the plastic trim panels.
The process is the same for the upper cushion. Take your
time and do one seat at a time so you can use the old one as reference in
case you forget where the anchor points are for each hog ring.
Here is the lower cushion flipped upside down. The middle
arrow or right arrow shows the next anchor point that has to be installed
with hog rings. After completing these three hog rings, work your way around
the perimeter making sure you have no wrinkles. Also, notice the carpet
on the seat springs that replaced the old burlap that was worn out. These
section is done. Notice the loose material on the left. This must be left
alone until the upper seat cushion is attached to the lower section. The
material will cover the hinge bolts and give a smooth finished look to the
seat. Use hog rings to cover the hinges, only two are required to join material
sections. The last item to install is the plastic trim panels.
The process is the same for the upper cushion. Take your
time and do one seat at a time so you can use the old one as reference in
case you forget where the anchor points are for each hog ring.
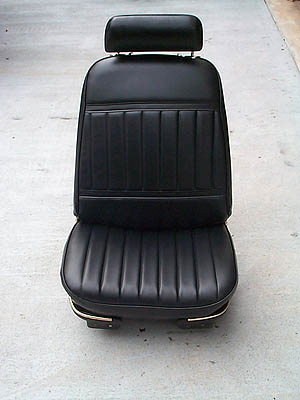 Wow, what a difference!
Total installation time was about one hour per section or
four hours total to do both seats.
Wow, what a difference!
Total installation time was about one hour per section or
four hours total to do both seats.
Costs
Seat Covers       $250/pr
Seat Foams        $100/set
Head Rests        $140/pr
Seat Back Button  $ 36/pr
Hog Rings w/pliers$ 21
Headrest Releases $ 37/set of four
Seat Backs        $ 70/pr
Seat Skirts       $ 40/pr, two pairs required
Manual Seat brkts $ 22/pr
P.seat brkts      $ 75/pr
Seat chrome trim  $ 17
Chrome end caps   $ 16/set
As you can see from the prices listed above, you can easily spend
over $600 to recover/restore a pair of bucket seats. It is always a good
idea to start with the best condition used seats that you can find for a
reasonable price or find some that may already be recovered.