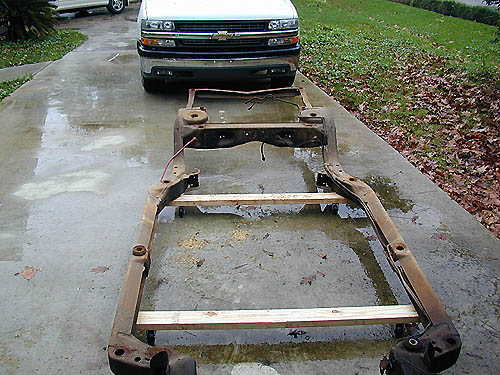
To remove my body from the frame, I took out the engine, tranny, radiator, master cylinder, core support, steering box, front fenders, inner fenders, gas tank, hood…all of this stuff was removed to either facilitate the 455 swap I'm doing or to repair rusty areas. Some of this does not need to be removed to separate body from frame. You can leave the steering gear and all suspension pieces on. I completely removed all the suspension pieces including rear axle and all wheels. This was to facilitate changing bushings. At this point, I decided to just go ahead and separate frame and body. All that was left connecting was the brake lines and the emergency brake cable. Most people leave the wheels on to roll the frame out. Since mine were already removed, I cut two pieces of 2 x 4 as wide as the frame. One I bolted to the holes the tranny cross member bolted to (one on each end), and the other I used 3" toggle bolts to bolt it to the 2" holes in the underside of the frame where it starts to go up over the rear axle. I got some 3" casters from Lowe's, which I bolted to the 2 x 4's. This facilitates me rolling the frame out from under the body. (see picture one)
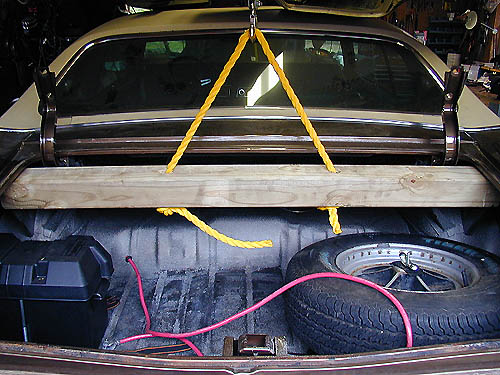
To actually separate body and frame, I started with the frame up on 4 jack stands. I removed the body bushing bolts; an air impact and PB blaster loosened the bolts easily. I took a piece of 4 x 4 and cut it to fit between the trunk supports that run on a diagonal upward from front to rear just under the front lip of the trunk opening. I drilled the 4 x 4 with 1" holes about 18" from the ends (not a real important number, just keep it even for balance). I then got some ¾" poly pro rope from the hardware store (6') and inserted the ends in the holes and put a knot in the ends. To this, I hooked a come-a-long and hooked the other end to the central beam in my shop. I jacked it up while keeping the 4 x 4 as far forward as possible, holding it up against the trunk hinges until it lifted up off the frame(see picture two).
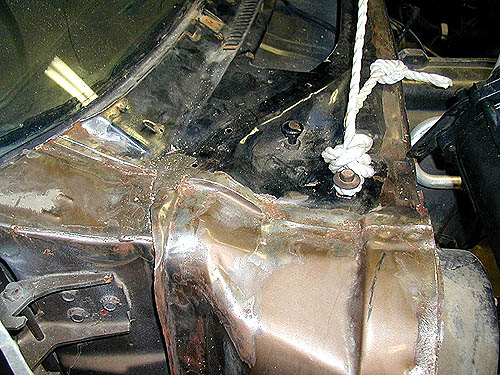
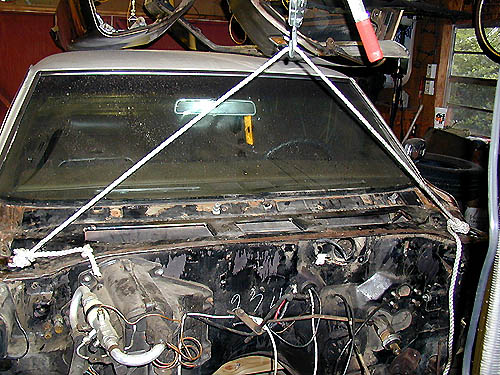
For the front, I used the rear most upper front fender-mounting bolt. It is the one that is on the cowl itself about 8" forward of the door hinges and 4" toward the center of the car. I tied some ½" poly pro, like you tie a hook on a fishing line (called a surveyors knot) around the fender bolts under the washers (see picture three).
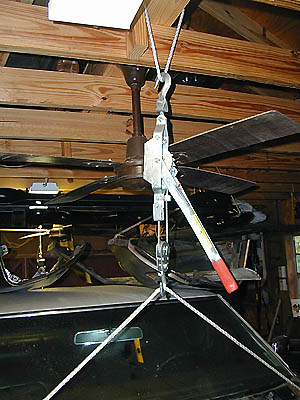
I screwed the fender bolts all the way in and hooked a come-a-long to the rope and hooked the other end to the shop beam and lifted the front of the body clear of the frame (see pictures four and five).
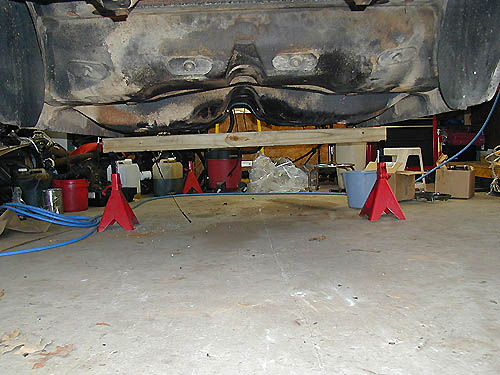
I then took another 4 x 4 that fit across the rear frame rails where the gas tank goes and jacked the frame up, removed the rear jack stands, and lowered the frame to the ground. I went to the front and jacked the frame up from under the front cross member and removed the jack stands and lowered the frame to the ground. I rolled the frame out of the shop. Then I took another 4 x 4 that was cut to stick out from either rocker panel 6" and put it under the front rocker about even with the door hinges and supported it with the jack stands and lowered the front come-a-long down until the body rested across the 4 x 4 (see picture 6).
I did this for two reasons, it made the body much more secure with no swinging at all, and I didn't want to rely on the bolts and ½" rope to support the body for that length of time. Be sure that you lift the body up high enough so that you can slide the frame back under it and put the jack stands wide enough so that the frame can clear them when you push it back under there (this is if you have to store the frame under the car for lack of room). As a warning I work with knots all the time and trust my life to my knots. I also know that ½" poly line has a working strength of over 1,000 pounds so I am completely comfortable with my rigging. You may knot be (I couldn't resist). So, chains can be used in place of the rope. It is about $2.00/ft more than the ¾' poly rope, but if you are unsure of your knot tying ability, use chain. If you use chain, I would bolt the chain to the rear 4 x 4 with class 5 or better hardware so the 4 x 4 stays flat. I first tied the ropes to it and the 4 x 4 rolled, and the edge of the 4 x 4 had the weight and wasn't spreading it out on the trunk edge. Your choice. Obviously use chain that the front fender bolts will go into, and if the bolts are not in good shape, use class 5 or better. Also, don't EVER get under anything that does not have proper jack stand support under it. You can also get away with only one come-a-long by come-a-longing the rear up and securing chain or rope between the ceiling beam and the chain or rope on the 4 x 4. Then lower the come-a-long until the weight is off of it and unhook it and move it to the front. You could also use an engine hoist in place of the come-a-long if you are using the ceiling beam. If you are outside or don't have a beam, then two engine hoists would be needed, one for each end. I like the little caster deal since it is so easy to roll it in and out and I can lift my frame onto saw horses and work on it at hip level or flip it on its side. Use swivel casters on the rear 2 x 4 and regular casters on the front. This is easier that it sounds. It is nice to have another set of hands to help with the 4 x 4's but not absolutely necessary.