If you are restoring a car the most important thing you can do is
purchase an Assembly Manual and then spend some time studying it. These
are the actual drawings that were referenced by assembly line workers while
the cars were being produced. These manuals not only show the parts and
part numbers, but often show letter codes, colors, paint stripe identification
colors and locations, and the proper routing of parts. They show when the
various production plants substituted different parts, and also list their
respective part numbers. They can also answer questions regarding “apparent”
discrepancies between different factory reference books; I will go into
this later. With a little bit of detective work, you can even get an idea
of what parts were brought into the plant as sub-assemblies and from this
infer how these parts were painted before being installed.
The one major drawback is that the manuals available to us as reproductions
are often incomplete, and many are the original issue documents, or are
early in the production year, so all the pages/revisions are not available.
Even so, there is an incredible amount of info that can be gathered, and
hours and hours of time that can be saved by installing the parts in the
right order and routing them correctly the first time. There is nothing
more aggravating then having to take apart a freshly painted assembly because
something else had to be done before it was installed, believe me, I have
been there.
REVISION DATES
One of the biggest problems I see people having with these manuals is understanding
revision dates, and determining how they relate to their cars. Often restorers
look at the sheets as “pictures” only, and assume that they accurately
show the correct parts for their cars. The reality is very different; each
drawing ONLY depicts the most up-to-date information. Changes occur throughout
the production year, and as they occur the drawings are revised to correctly
represent these changes. By understanding and using revision blocks we can
see when these changes took place and know which parts are correct for our
cars. I will give 2 examples that will help explain what I mean.
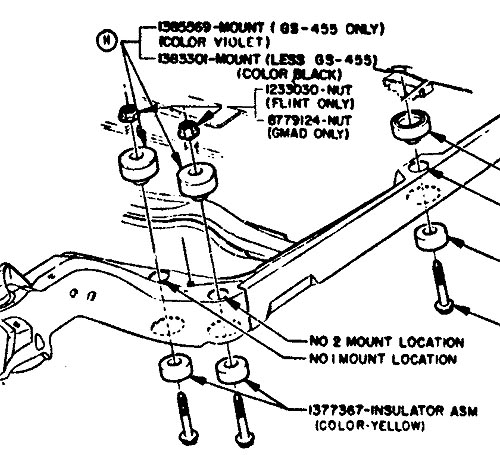
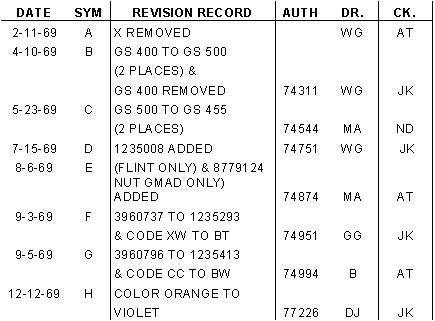
In the 70-assembly manual, page 2-3.1 lists the frame and body mount information
for A-body Buicks. If you look at the revision block in the upper right
hand corner, it lists Revision “H”, dated 12/12/69 as “Color
Orange to Violet”. (See attached Chart) Now looking at the drawing
and finding “H” you see it is referring to the body mounts at
the firewall, and the color for these are Violet. (See attached Drawing)
It is also important to note that revisions A thru G are now part of the
drawing, so the only revision that is “called out” on the drawing
will be the last one, in this case revision “H”. All earlier changes/revisions
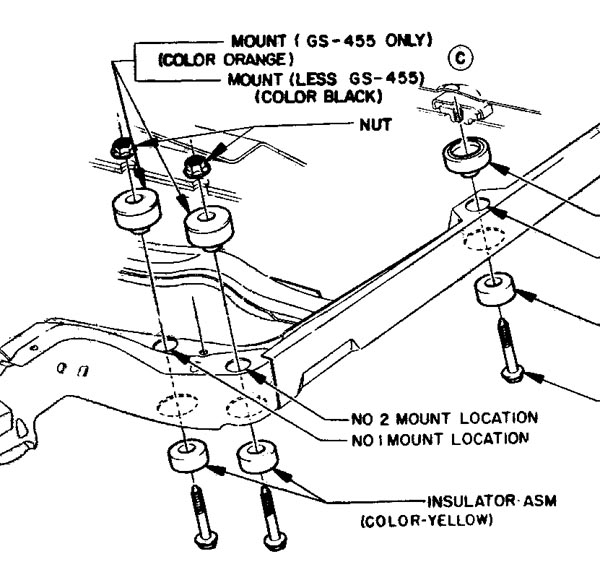
will only be listed in the revision block. Now, if you go to page 20-7 in
the 70 Chassis Service Manual, that was printed at the beginning of the
production year, you will see the same drawing, but here it lists those
same body mounts as Orange in color. (See attached Drawing) If you search
that page for the revision letter you will find it is an earlier revision,
namely revision “C”. The assembly manual lists revision “C”
as dated 5/23/69, so now you can see that the body mounts were originally
orange, but changed to violet sometime after 12/12/69. Now I know this particular
change is not important in the grand scheme of things, but you get the idea.
Here is an important example from the 71-assembly manual. Pages 12-8.8 and
12-8.9 show the batteries and cables for 350 and 455 cars respectively.
Both pages have revisions dated 2/22/71 that list changes for battery part
numbers and note that the cables were also revised. Both drawings show side-mount
batteries and cables, but if you look in the 71 Chassis Service Manual,
that was printed at the beginning of the production year, on page 120-6,
you will see they list that top-post batteries were standard equipment for
A-body Buicks. This date of 2/22/71 is important because that was when the
drawings show the batteries were changed from top-post to side-mounts.
Now, I would like to add a few words of caution here, the above date is
the date for that particular revision drawing. This does not necessarily
mean that this change was implemented on this date, or that every production
plant introduced the change at the same time. To assume something like that
would be ludicrous. I work with drawings everyday, and while some are developed
months in advance, others have your boss breathing down your neck, because
they are needed right away. I am sure this was also the case when these
drawings were being produced.
What we can say for sure is that before 2/22/71 all batteries installed
in A-body Buicks were of the top-post variety, and that sometime after that
they were switched to side-mounts. The next revision date for these drawings
is 3/22/71 and shows that the negative cable was rerouted due to a change
in an Air Conditioning hose. From this we can further pinpoint the battery
change to sometime between 2/22/71 and 3/22/71. To get closer to the actual
date this change was implemented, you would need to look at original cars
from that time period, but with cars being made at different plants I don’t
know how useful this would be.
To sum everything up, using assembly manuals and understanding revision
dates can save you both time and money. They not only help with installing
parts correctly the first time, but also show which parts are correct for
your car. If using an assembly manual stops you from buying just one incorrect
part it can save you more then the $30.00 or so that they cost to buy. I
hope this helps make your assembly manuals more useful for your restorations.