Nine years ago when I originally bought my 1971 Buick Skylark coupe, I discovered that the original owner had not liked the car’s original radio and had replaced it with a Sony AM/FM cassette radio. The tunes sounded good driving around in the Buick but the newer radio stuck out like a sore thumb in the original interior – especially as the radio surround had been cut to fit in the Sony radio. Eventually I located an uncut radio surround and an original 1971 Buick AM/FM radio and returned the sound system to its original stock appearance.
But switching from an after market radio to the original made me notice the obvious differences. For one, no more putting in my personal cassette tapes to customize my listening pleasure. Two, the fader had started to go on the original radio which required me to fiddle around with the tuner trying to keep my favorite stations locked in with as little fuzz as possible. I loved the original look of the interior but was disappointed that listening to tunes just was not the same anymore.
I stuck with the original radio for eight years before deciding to try and upgrade my Buick’s sound system. What made me finally make the decision was that my Buick’s rear package tray needed to be replaced, and when ordering a repro from Year One, I noticed a deluxe version with speaker holes. This choice made me realize how much I wanted to have the ability to listen to my personal music collection so I ordered the deluxe package tray, installed 6x9 speakers in the rear, and began planning my Buick’s new sound system.
I knew that I wanted an AM/FM CD radio this time around but was undecided on where to install the new radio. No way was I going to remove the stock radio as it was hard enough to find it and an uncut radio surround plus I wanted to keep the interior looking stock. At some car shows I had seen cars in which their owners had installed an aftermarket CD radio in the glove compartment, which was a great hidden feature. The only problem with that is changing CDs while you were driving by yourself would be an impossible task as the driver was too far away from the glove compartment. Another option was the “hidden” audio system with remote for a multi CD changer in the trunk that sold in various auto magazines but the radio and CD player cost over $400, which was over the budget I wanted to spend. I anguished over what to do for a long while before a fellow Buick owner shared some information with me that I never knew – that a modern radio could fit inside an original underdash Buick 8-track player!
I know there are purists who will say, why on earth would I take apart a Buick 8-track player when they are hard enough to find. To this I would certainly agree, but I was not looking to buy a show quality 8-track player, or even a working one. I just wanted a junk one which I could buy cheaply and use for my project. Plus, I was working on a budget – working players were available for over $100 and I had seen some show quality players for around $300. Ebay (though some people refer to it as Evil bay due to some ridiculously high prices) is always a good place to look and I did see some original Buick underdash 8-track players being sold from estate sales for various prices. But I lucked out as another Buick owner had one he was willing to sell to me for $45 as he only bought it for parts and instead bought a show quality one.
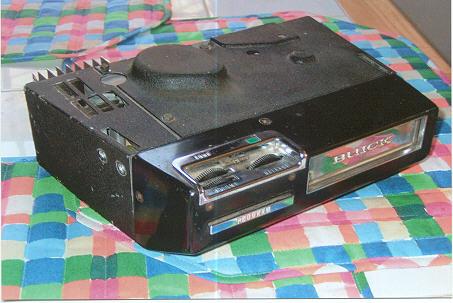
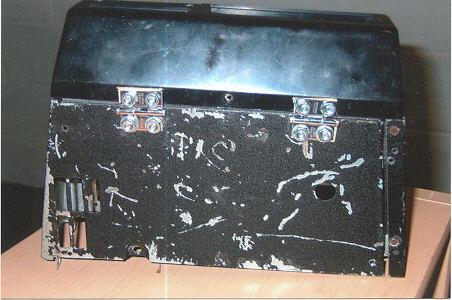
So, a few weeks later and $45 less I received the Buick 8-track player. It was definitely worse for wear with plenty of scratches, something rattling on the inside, and a small dent in the back of the player. But all these were superficial and now I had the beginning of the project. There was the problem that the player did not have its mounting bracket. For this piece I looked all over but had no success at all with finding just a Buick 8-track bracket. For a little while I thought the project was going to have a very long delay until I found a guy on ebay selling an 8-track bracket for a 1969 Camaro. The bracket looked like it might work on the Buick player and after contacted the seller he seemed to agree (though this could have very well have been his ploy to sell me the bracket!). I took the gamble and bought the Camaro bracket and luckily it worked perfect on the Buick 8-track player – though it does have a different appearance from an original Buick bracket. Now it was time to start getting to work on taking the player apart.
The actually disassembly of the 8-track player was the easiest step of the conversion. There are four screws holding on the front plastic face (one each on the top and bottom and one on each side), and four tiny bolts holding together the 8-track shell (two on top and two on the bottom). With the 8-track player apart, the next step was to remove the chrome pieces and save them along with the four bolts that held the shell together. The chrome program selector was the first piece to remove as two smaller screws on the front plastic held it in (the volume wheels would come out by pulling them off their metal rod). The chrome 8-track door with the word Buick and the chrome Program button took some more time and finesse to take out of the unit as I had to unscrew some interior parts to aid in their removal. I saved the chrome pieces in a plastic bag to be reinstalled later and put the shell back together minus the guts with the four bolts. I saved the 8-track guts and was actually able to sell them to another Buick owner for $15 for parts.
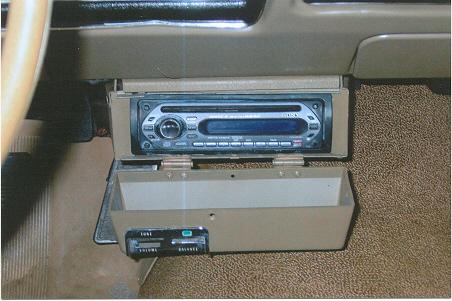
The most difficult and time-consuming part of the conversion was figuring out how to allow access to the new radio inside in the 8-track shell so you could insert CDs. For this, I had to devise a way to get the front plastic face of the 8-track player to be removed. I decided to install hinges underneath the player so that the front plastic face could swing down and allow access inside. I made a trip to Ace hardware and purchased one-inch stainless steel hinges, along with various screws and bolts to install them as well as to mount the unit under the dashboard. After a lot of test fitting, I drilled holes for the hinges and screwed them in (spacers were needed so the hinges would not rub against the metal).
A Sony AM/FM CD player with remote and I-Pod capability was purchased to install inside the 8-track shell. Installation of the CD player inside the 8-track shell involved me using industrial strength Velcro underneath the CD player to keep it cushioned on the bottom and staying in one place, two-inch VCR brackets screwed in the back of the 8-track shell which held against the sides of the CD player to secure it, and small cut heater hose sections filling in the inside gaps of the 8-track shell to provide more cushioning. To fill in the two gaps on either side of the front of the CD player I bought a small sheet of aluminum, cut two pieces to cover the gaps, painted and then superglued them into place. The back of the CD player stuck out about three inches from the back of the 8-track case which was fine as it made it easier to hook up the wiring.
As I wanted the 8-track player to match my interior, I decided to paint it the same color as my dashboard – dark sandalwood. For the paint I called up The Auto Color Library, which specializes in custom paint orders. You could send them a piece of trim to color match but another Buick member with the same color interior had given me the code for dark sandalwood (DDL-TCP122603). I had the company mix the paint in the spray can so I could paint the 8-track player quickly and easily (not too expensive either - $21 with shipping). A few coats of paint later and my 8-track player was the exact same color as my dash.
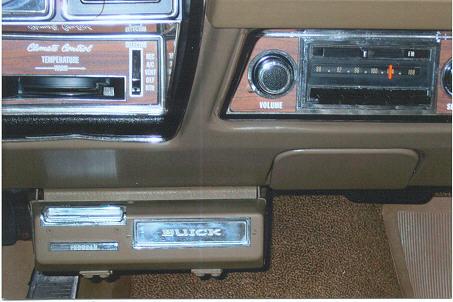
The last step was to mount the new Buick 8-track CD player under the dash of my car. There already was one existing hole and I drilled to create another one. After the hardwiring was done, I started the Buick and turned on the new radio. It worked perfectly and so I popped in my AC/DC “Back in Black” CD and down the road I drove enjoying crystal clear rock and roll. For anyone interested in also doing this project, the system I built is the same for all 70-72 Buick underdash 8-track units. The 68-69 units were very similar and so the same technique should apply to them as well. The total cost of my project was $250 (for the 8-track unit, parts, and $140 for the CD player). I consider the Buick 8-track CD player the ultimate hidden audio system because unlike glove box or trunk installed systems, the one I built hides in plain site and allows easy access for the driver of a classic Buick.