So here I am at Las Vegas Motor Speedway for the 2nd Annual Buick West Coast Nationals in November of 2002. I’m all fired up to finally get the chance to run my 70 GS on a real track - and against other Buicks no less. Talk about excited. I’m going to break into the 12s or bust. I’ve got the line-lock wired and working fine, 3.55 posi and a pretty good Street/Strip combo. No sweat to get into the 12s for the first time, right? Then, after a few Test and Tune runs my buddies Len Bentley and Skip Ylhainen inform me that “You’re only spinning one wheel in the burnout box” (What? No way!), and spinning the Drag Radials all the way through first gear and part of 2nd. So we inspect my rear quarters and low and behold, one is covered with rubber and the other has only a few specs. Checking my time slips, I’m seeing 2.0 and worse 60’ times. I was blaming the Drag Radials for the 60’ but Holy Cow - my posi is worn out! I managed to eek out a 12.87 @ 108.76 but I’m just imagining what I might have done with a working positraction and a decent 60’. Rats!
Fast forward a few weeks and I’m asking around V8Buick.com BB and Buickperformance.com email list about what to do. Knowing how hard it can be to find 8.2” stuff, how expensive it is, and the fact that “it’s weak”, I’m resigned that I’ll have to go to Moser, Currie, and/or Mark Williams to either build the 12-bolt I have in the weeds behind my shop or have a 9” Ford built for my car. Best (read: cheapest) case is I might find a good 8.5” for the GS but I’d rather not spend the cash or time right now on any of these options for a street/strip car. But what’s a guy to do? I can’t run around on a pegleg.
Enter Mike Garrison. He tells me of a simple and INEXPENSIVE posi repair that he’s done. Mike says he did it to Basketball Sam’s (Davis) car in the pits at one of the Buick events several years back, and Sam is still running mid-12s with it. Hmmm – Mike’s been around the block more than a few times in some pretty stout Buick iron - chances are good he knows what he’s talking about. So what if I haven’t had a rear end apart before, someone will walk me through it. And what do I have to lose but ET? So Mike sends me some pictures and calls me (on his nickle) to give me the straight scoop. Sounds easy enough, I’ll go for it.
1. Remove rear cover, drain fluid.
2. Remove 4 posi-carrier main bearing cap bolts and 2 bearing caps.
(Note the number and position of the shims on each side of the carrier so
you can be sure to get them back in the right places.)
3. Slide the posi-carrier straight back to remove. You might have to tilt to one side. Again note position of parts.
4. Take the posi unit to your bench and remove the carrier case bolts. Use caution – it is spring-loaded - the springs and stuff might jump out at you. Take careful note of how the parts mate for reassembly. The spider gears and cones should be replaced in the same side as original. Check all parts for gouging, cracks, etc.
5. You should now have the cones separated from the unit. Check their tooth height; they will probably be .020-.030 or about the thickness of a dime.
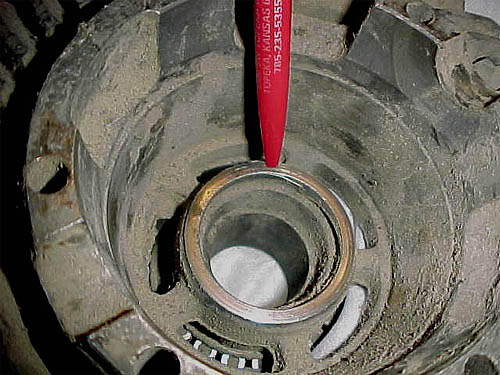
6. In the housing you’ll see the tapered sides where the cones reside; where the axles slide into the carrier. This is the area that needs to be machined. Have a machine shop take .150 (that’s 150 THOUSANDS) off this area with a lathe, on both halves of the housing. CLEAN, CLEAN, CLEAN everything.
7. Now you need a couple hardened (Grade 8) washers equal in diameter to the posi springs. .060-.080 thickness. One goes on the end of each spring to increase spring pressure and force the cones deeper into the tapered housing for grip. I ended up with a combination of springs to get me .120 - .150. I have one big washer for the outside springs and a smaller one for the little inside spring. The important thing is to end up with the correct total thickness.
8. This is also a good time to check your ring gear bolts. Previously, I had found one missing from my rear end, and I mean missing. It was not in the ring gear and nowhere to be found in the rear end housing. Several others were loose. I replaced the ring gear bolts with ARP #230-3001, torqued to 60 ft lbs. They should be installed with Loc-Tite red. I just replaced one at a time, torqued to 60 ft-lb., then removed the bolts one at a time, coated the threads with locking compound and re-installed the fastener, torqued to 60 ft-lb. Install and torque the fasteners in a crossing pattern to evenly distribute the load. If you remove the ring gear be careful not to cock the ring gear when pulling it back onto the carrier or it will crack. I also replaced the posi case bolts with ARP #651-3250 (5/16”-18 x 3.250) and torqued to 20lb/ft.
9. Get a couple bottles of GM Posi-Additive for reassembly. Use it liberally. Reverse procedure to reassemble the carrier back into the rear end housing, being sure to get the shims in the same position. This will ensure that your backlash remains as it was. Torque the bearing cap bolts to spec (which I can’t remember).
10. Install the cover and fill with your favorite gear lube. I like Redline synthetic.
I have PAIRS of black streaks all over my shop floor to prove it
works.
Now I’m looking forward to hooking. Thanks to Mike Garrison for the
very effective and cheap repair procedure.